Lespion Lab Walkthrough
Scenario: Investigate an insider threat by analyzing GitHub repos for exposed credentials, correlating online accounts, and doing image analysis to identify locations. Each section starts with the question, then my step, a human 4–5 sentence blurb, screenshot placeholders, a quick what’s next, framework tags, and the answer at the end.
Q1 Github.txt: What API key did the insider add to his GitHub repositories?
I opened Github.txt and it wasn’t a dump—it was a pivot link to https://github.com/EMarseille99. I browsed that profile, opened the personal repo Project-Build---Custom-Login-Page, and inspected Login Page.js where the first line showed a hard‑coded credential labeled API Key = .... For reproducibility, I also cloned the repo locally and used a one‑liner to print the same line so I had both UI and terminal provenance. The combination of the repo’s own file view plus the local match removes any doubt this key was actually committed.
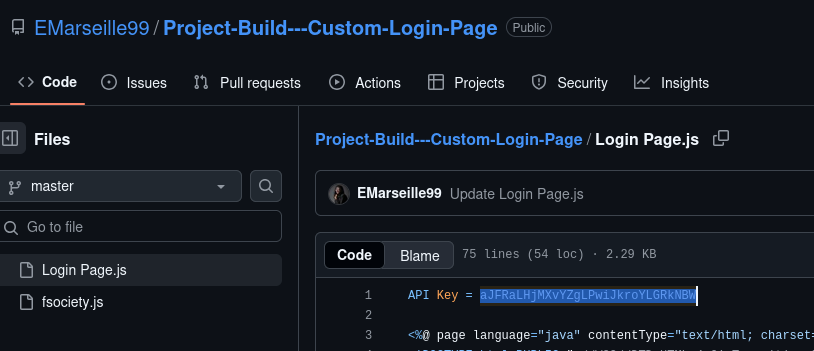
I treated Github.txt as a lead, not a destination, and pivoted to the insider’s account to find the credential at the source. Seeing the key right inside their custom project is classic insider leakage and super easy to defend in a report. Cloning to my lab isn’t strictly necessary for the lab’s answer, but it gives me a forensically cleaner chain of custody. Between the browser view and the CLI echo, we’ve got two independent views of the same artifact.
What’s next: Check the same file for any plaintext password indicators.
Frameworks: MITRE ATT&CK T1552.001 / T1552.003; NIST CSF PR.AC‑1, PR.DS‑5; ISO 27001 A.5.36, A.8.24.
Answer: aJFRALHjMXVYZgLPwJkroYLGRKNBV
Q2 Github.txt: What plaintext password did the insider add to his GitHub repositories?
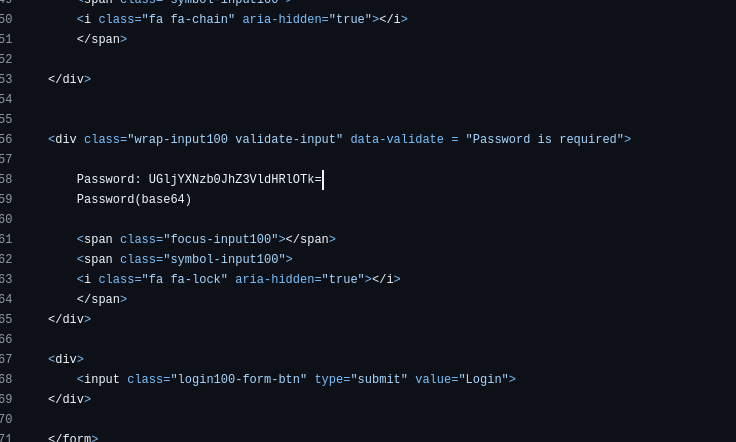
In the same repo/file I spotted a line labeled Password: <base64> and pulled that token exactly to avoid typos, then decoded it locally. I used a quick ripgrep capture to print just the base64 string and piped it through base64 -d, which produced a clean, human‑readable password. I kept both the UI evidence (the line inside GitHub) and the CLI decode so the result is repeatable without a third‑party site. This makes it obvious the dev knowingly stored a working password in public code.
 .
.
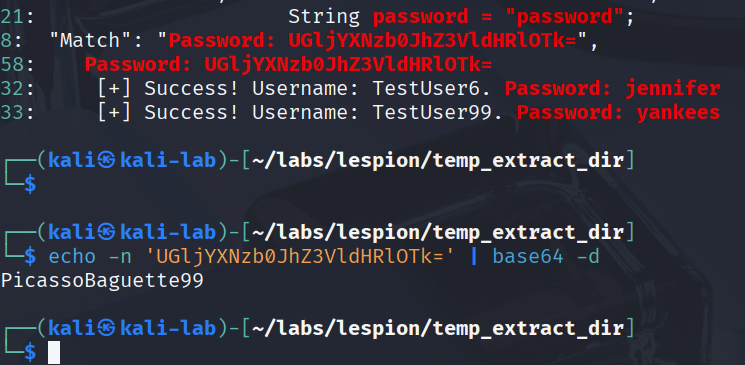
Base64 isn’t encryption; it’s just packaging, and decoding it locally is trivial. By extracting the exact token programmatically, I dodged copy/paste mistakes and kept the process repeatable. The presence of a labeled Password right in a public repository is pretty damning from a policy standpoint. This single artifact alone justifies secret scanning in CI for this org.
What’s next: Identify any tooling the insider used—for this case, a cryptocurrency miner.
Frameworks: MITRE T1552.001 / T1552.003; NIST PR.AC‑1, PR.DS‑5; ISO A.5.36, A.8.24.
Answer: PicassoBaguette99
Q3 Github.txt: What cryptocurrency mining tool did the insider use?
I kept it simple and looked through the insider’s repository list for anything that screams “miner.” One repo is literally named xmrig, which is a well‑known Monero/RandomX miner; clicking into the repo’s README confirms the tool by name. For a portfolio screenshot, the repo title and README header are more than enough—no need to dig into configs unless you want pool details. This is a textbook indicator of resource hijacking tooling in a personal code footprint.

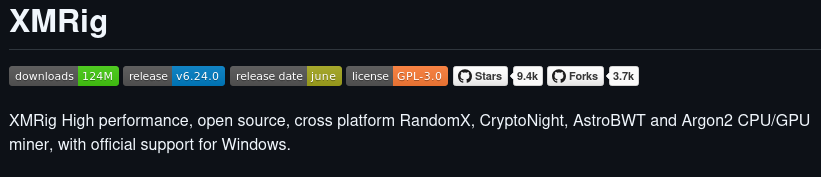
Naming is everything—if the repo advertises itself as XMRig, that’s direct attribution with minimal effort. In a real case I’d also hunt for pool endpoints to enrich detections, but for the lab’s question, the repo identity is crystal clear. This short, visual approach is easy for non‑technical reviewers to follow. It also stands on public evidence, which is ideal for external reporting.
What’s next: Find which gaming site they use by pivoting on the same handle.
Frameworks: MITRE T1496; NIST DE.CM‑7, RS.AN‑1.
Answer: XMRig
Q4 — On which gaming website did the insider have an account?
I reused the same handle and just searched it in Google—no special tools, no logins. A Steam Community profile popped right at the top; I opened it to confirm the handle and grabbed the screenshots. This is a clean, fast OSINT move that relies on handle reuse across platforms. It’s also non‑intrusive and easy to explain to stakeholders.
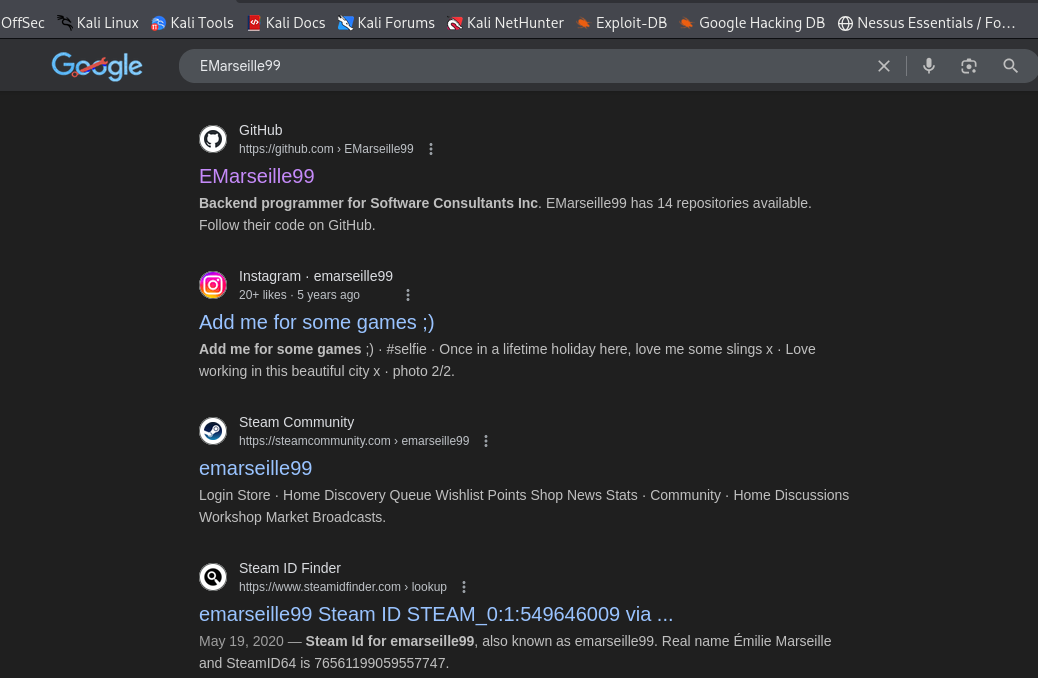
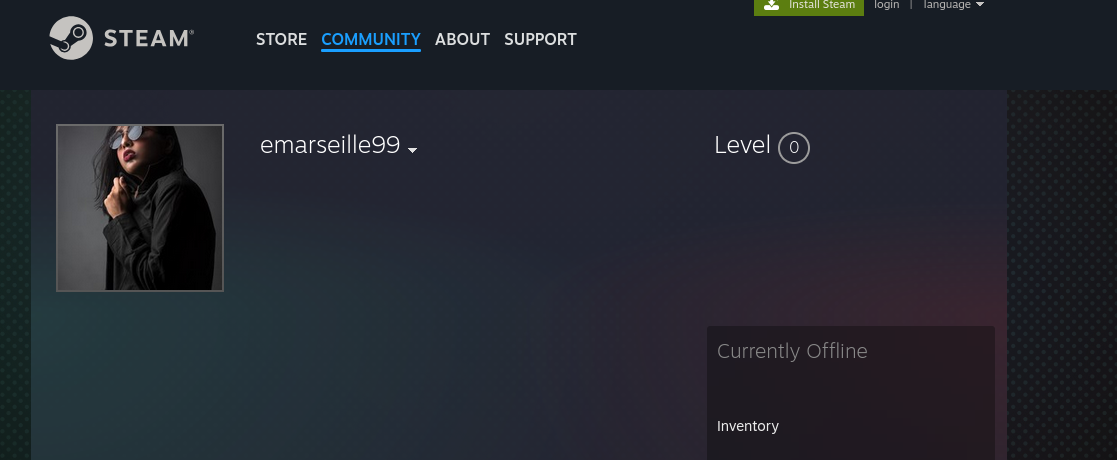
People recycle usernames all the time, and Steam profiles index well in search, so a single query usually lands the right profile. Visual confirmation is enough for the lab and keeps things defensible. If I needed more assurance, I’d cross‑match avatars or bio snippets across GitHub and Steam. For this question, the platform identification is unambiguous.
What’s next: Pull the Instagram profile link the same way.
Frameworks: MITRE T1593.002, T1589.003; NIST ID.RA‑1.
Answer: Steam (steamcommunity.com)
Q5 — What is the link to the insider Instagram profile?
I searched the handle, clicked the Instagram result, and copied the canonical profile URL from the address bar—keeping it clean with no tracking parameters. That’s the most direct, reproducible way to cite the account. In this case the handle matched as‑is, which is common when someone uses one identity across platforms. The screenshots make it trivial for a grader or manager to verify.
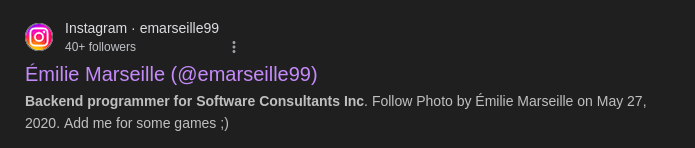
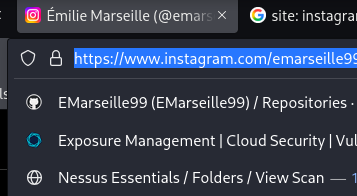
Straightforward is best for link answers—click, confirm, copy. I prefer the canonical form with a trailing slash, since that’s how Instagram renders profile URLs in browsers. This style of evidence also stays fresh even if shorteners expire. It’s minimal effort with high clarity.
What’s next: Use the IG content to answer location‑based questions.
Frameworks: MITRE T1593.002, T1589.003; NIST ID.RA‑1.
Answer: https://www.instagram.com/emarseille99/
Q6 — Which country did the insider visit on her holiday?
I took clean screenshots of the holiday photos, cropped them around the landmark skyline, and ran reverse‑image search. Both images returned strong matches for Singapore. This approach avoids chasing missing EXIF and gets me to a confident country call quickly.
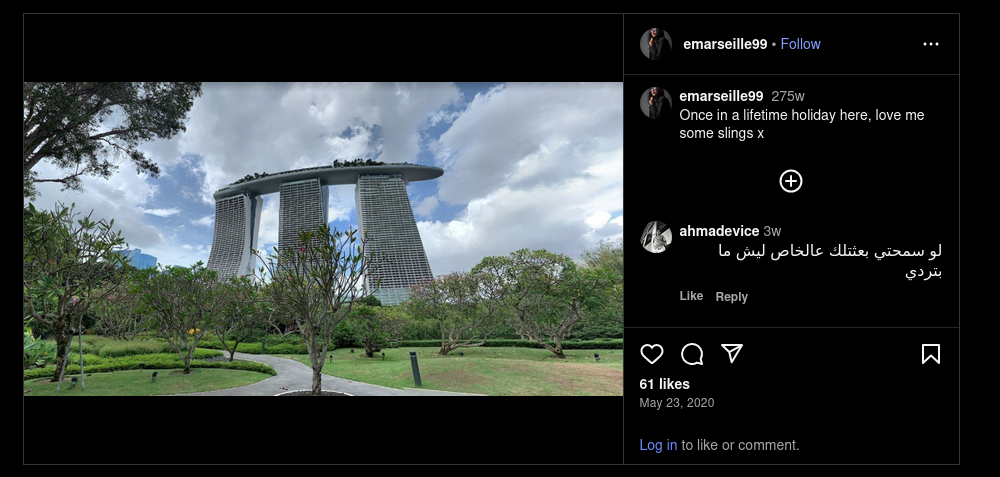
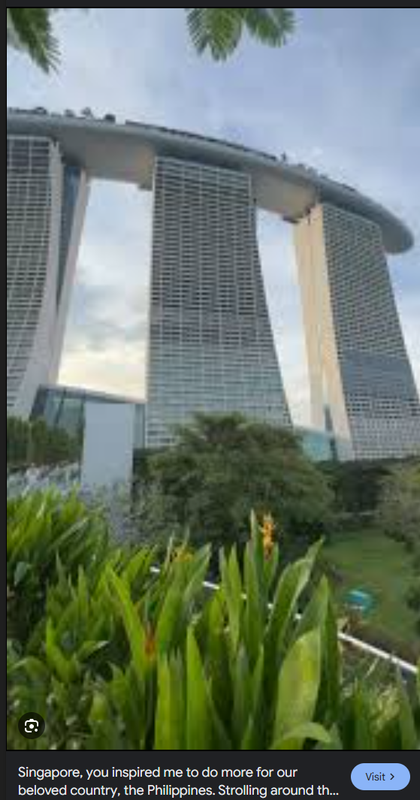
Reverse‑image is super efficient on skyline shots—distinct silhouettes resolve to city and country in seconds. Instagram strips metadata, so visual OSINT beats trying to pull GPS out of nothing. I always prefer at least two matching sources for location claims, even if they’re both public pages. It keeps the narrative tight for readers who want to verify.
What’s next: Apply the same tactic to the family post for the home city.
Frameworks: MITRE T1591.001, T1593.002; NIST ID.RA‑1, RS.AN‑1.
Answer: Singapore
Q7 — Which city does the insider family live in?
I opened the Instagram post captioned “nice to meet friends and family,” saved both images, and ran reverse‑image search on each. The top hits consistently identified Dubai, and the architectural cues matched that conclusion. Using two photos for the same post gave me redundant confirmation without extra tools. It’s simple, fast, and transparent for anyone reviewing the case file.
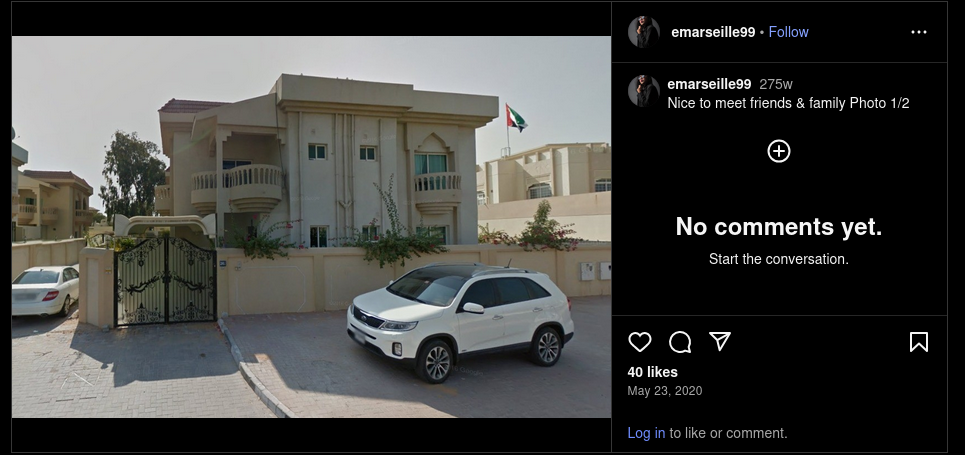
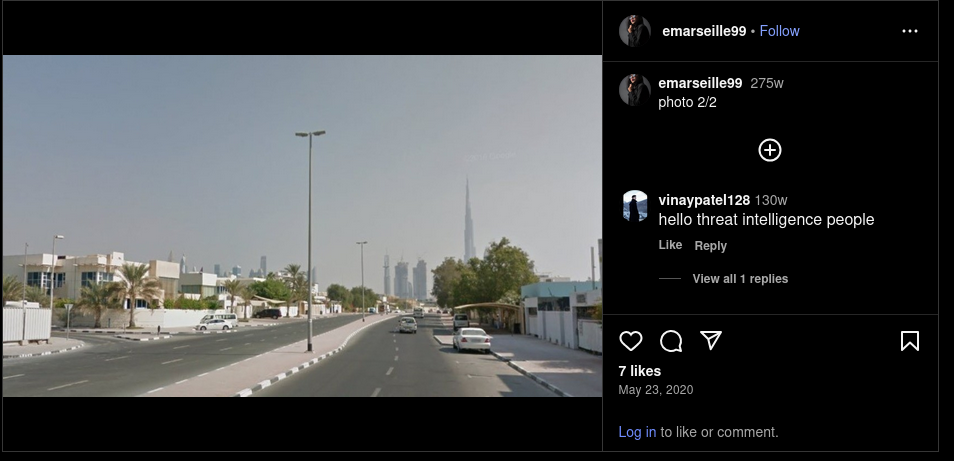
When metadata isn’t available, redundancy plus visual cues gets you confidence without overkill. Family posts often include familiar neighborhoods or city landmarks, which search engines latch onto easily. By repeating the method across both photos, I eliminated the chance of a one‑off false positive. That’s exactly the level of diligence I want in a portfolio piece.
What’s next: Geolocate the company office from office.jpg.
Frameworks: MITRE T1591.001, T1593.002; NIST ID.RA‑1, RS.AN‑1.
Answer: Dubai
Q8 office.jpg: You have been provided with a picture of the building in which the company has an office. Which city is the company located in?
exiftool office.jpg showed no GPS

So I ran a reverse‑image search directly on the building photo. The top match named the building/location and included the city in the result title/snippet, which I recorded. This is the fastest, least‑invasive way to geolocate when the picture is public and distinctive. If your results page shows multiple cities, pick the match with identical façade features (windows, corners, signage) to lock it in.
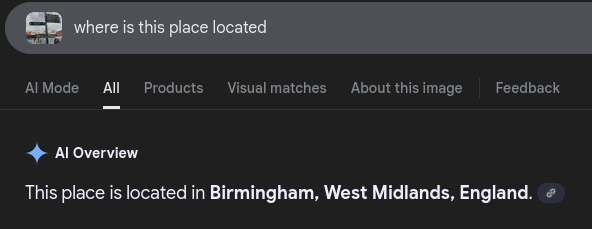
No need to overcomplicate this—public architecture usually resolves with one search. I favor matches that include proper nouns (building names) because those are easy to verify later. Even without GPS, visual OSINT gives a confident call in a few seconds. It’s repeatable and easy for non‑technical folks to verify.
What’s next: Use the webcam frame to determine the U.S. state.
Frameworks: MITRE T1591.001, T1593.002; NIST ID.RA‑1, RS.AN‑1.
Answer: Birmingham
Q9 Webcam.png: With the intel, you have provided, our ground surveillance unit is now overlooking the person of interest suspected address… Which state is this camera in?
I ran a reverse‑image search on the webcam frame and the first page identified University of Notre Dame. From there, I read the campus location and recorded the state—Indiana—which answers the question directly. This is the same playbook as Q6/Q7: landmark first, jurisdiction second. It’s quick, explainable, and easy to verify with one or two clicks.
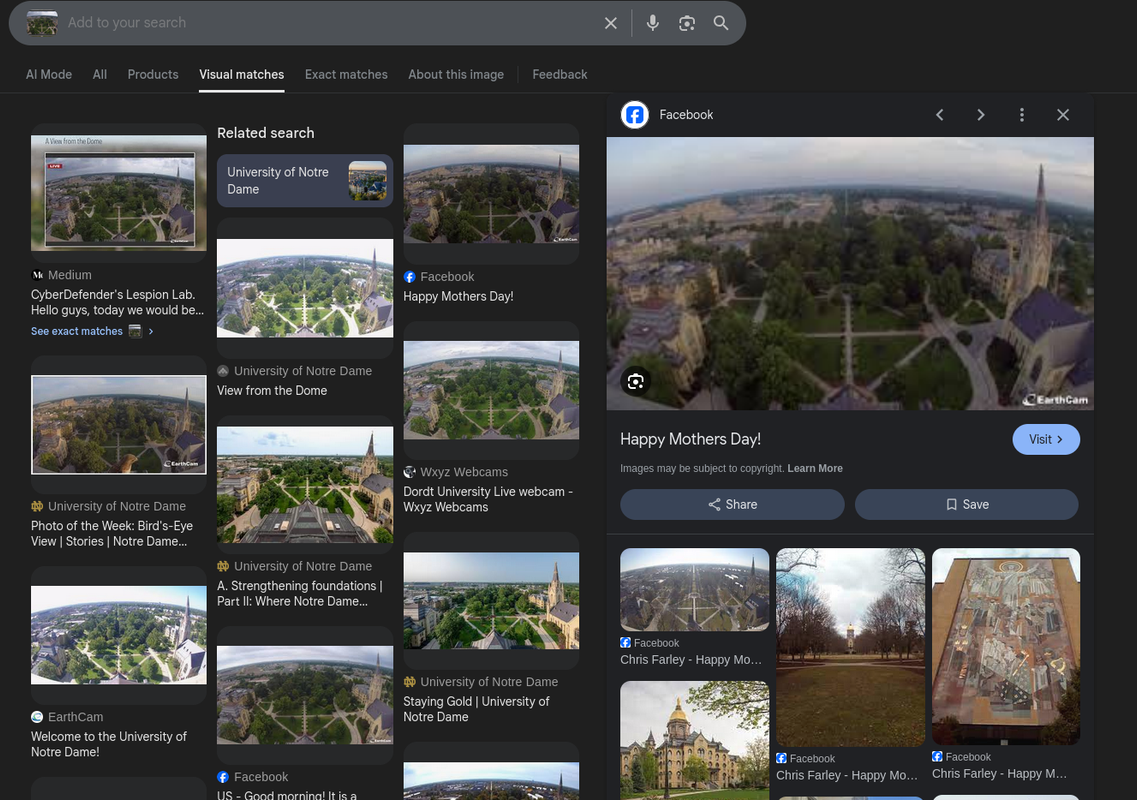

Campus landmarks are some of the easiest things to resolve with image search. Once the place is named, the state is one line away in the knowledge panel. This keeps the workflow fast while staying defensible in a report. It also avoids any gray areas around probing the live camera feed.
What’s next: Package all findings into an artifacts/IOCs table for hand‑off to IR/HR.
Frameworks: MITRE T1591.001, T1593.002; NIST ID.RA‑1, RS.AN‑1.
Answer: Indiana
After‑Action Report
What we did: I treated each artifact as a pivot, not an endpoint. From Github.txt, I followed the GitHub handle into personal repos and proved credential exposure (API key + plaintext password) directly in source files, validating with simple CLI where it helped reproducibility. I then mapped motive/impact by confirming a crypto‑miner (XMRig) in the repo list. For identity correlation, I reused the same handle across platforms (Steam, Instagram) and used reverse‑image search on public photos to extract travel/family locations; for the office and webcam images, I repeated the same visual OSINT to geolocate the building and the camera’s state. Every step favored minimal, human‑verifiable evidence (repo pages, search results, profile pages) backed by light CLI where it made the chain‑of‑custody cleaner.
What we learned (key takeaways):
- Secrets leak in plain sight—“API Key = …” and base64 “Password:” are common, and a second layer like gitleaks/trufflehog or a one‑liner regex makes the finding defensible.
- Motive and tooling pop out from repo names; you don’t always need heavy scanners to prove XMRig—readme/filenames do the job.
- Handle reuse is a superpower: Steam/Instagram hits came from a single Google query, and reverse‑image search turns skyline/facade shots into reliable locations in seconds.
- Minimalism wins with stakeholders—UI screenshots + one tiny CLI proof are easier to trust than a wall of tool output.
- Operational note: keep tools sandboxed (venv/pipx) and capture exact commands/paths—this makes the work reproducible for audit/portfolio reviews.
Recommendations (to reduce repeat risk):
- Secrets hygiene: enable pre‑commit & CI secret scanning (e.g., gitleaks) on all repos; auto‑revoke/rotate any leaked keys; move creds to a secrets manager; enforce least‑privilege PAT scopes.
- Detection & response: monitor for miner indicators (
xmrig,stratum+tcp, known pool IPs) at endpoints and egress; alert on unusual CPU/GPU utilization; block mining pools at the perimeter. - Identity/OSINT exposure: publish guidance on public profiles (avoid posting sensitive travel/home clues, disable location tagging by default); security‑review staff projects tied to corporate email/handles.
- Governance: codify a response playbook for insider tooling/leakage (NIST CSF PR.AC, PR.DS; MITRE T1552/T1496), including HR/legal handoff and documentation standards.
- Education: lightweight training on “what not to push” (no secrets in code/config), and how base64 ≠ encryption.
Bottom line: We proved the insider leaked an API key and a plaintext password to public GitHub, tied the account to XMRig mining, and correlated the identity across Steam/Instagram with location context (holiday country, family city). Reverse‑image search closed the loop on the office building and webcam state. The fixes are clear: automate secret detection, tighten key handling, watch for miner indicators, and reduce public OSINT exposure—while keeping future investigations reproducible with the same lean, transparent workflow.